Platform
Status Pages
Cronitor's Status Pages provide a transparent way to communicate the health of your services to your users and stakeholders. They automatically reflect monitor status and help you manage incidents during outages.
How Status Pages Work
Status Pages turn your Cronitor monitoring data into public communication. Your cron jobs, APIs, websites, and heartbeat monitors feed directly into status components, or you can create custom components:
Monitor Integration — Your existing uptime, cron job, and heartbeat monitors become status page components. No additional setup required.
Real-time Incidents — Monitor failures will create incidents on your status page. Incidents can also be created manually for planned maintenance or complex issues. Incidents can be updated in real-time and are stored historically.
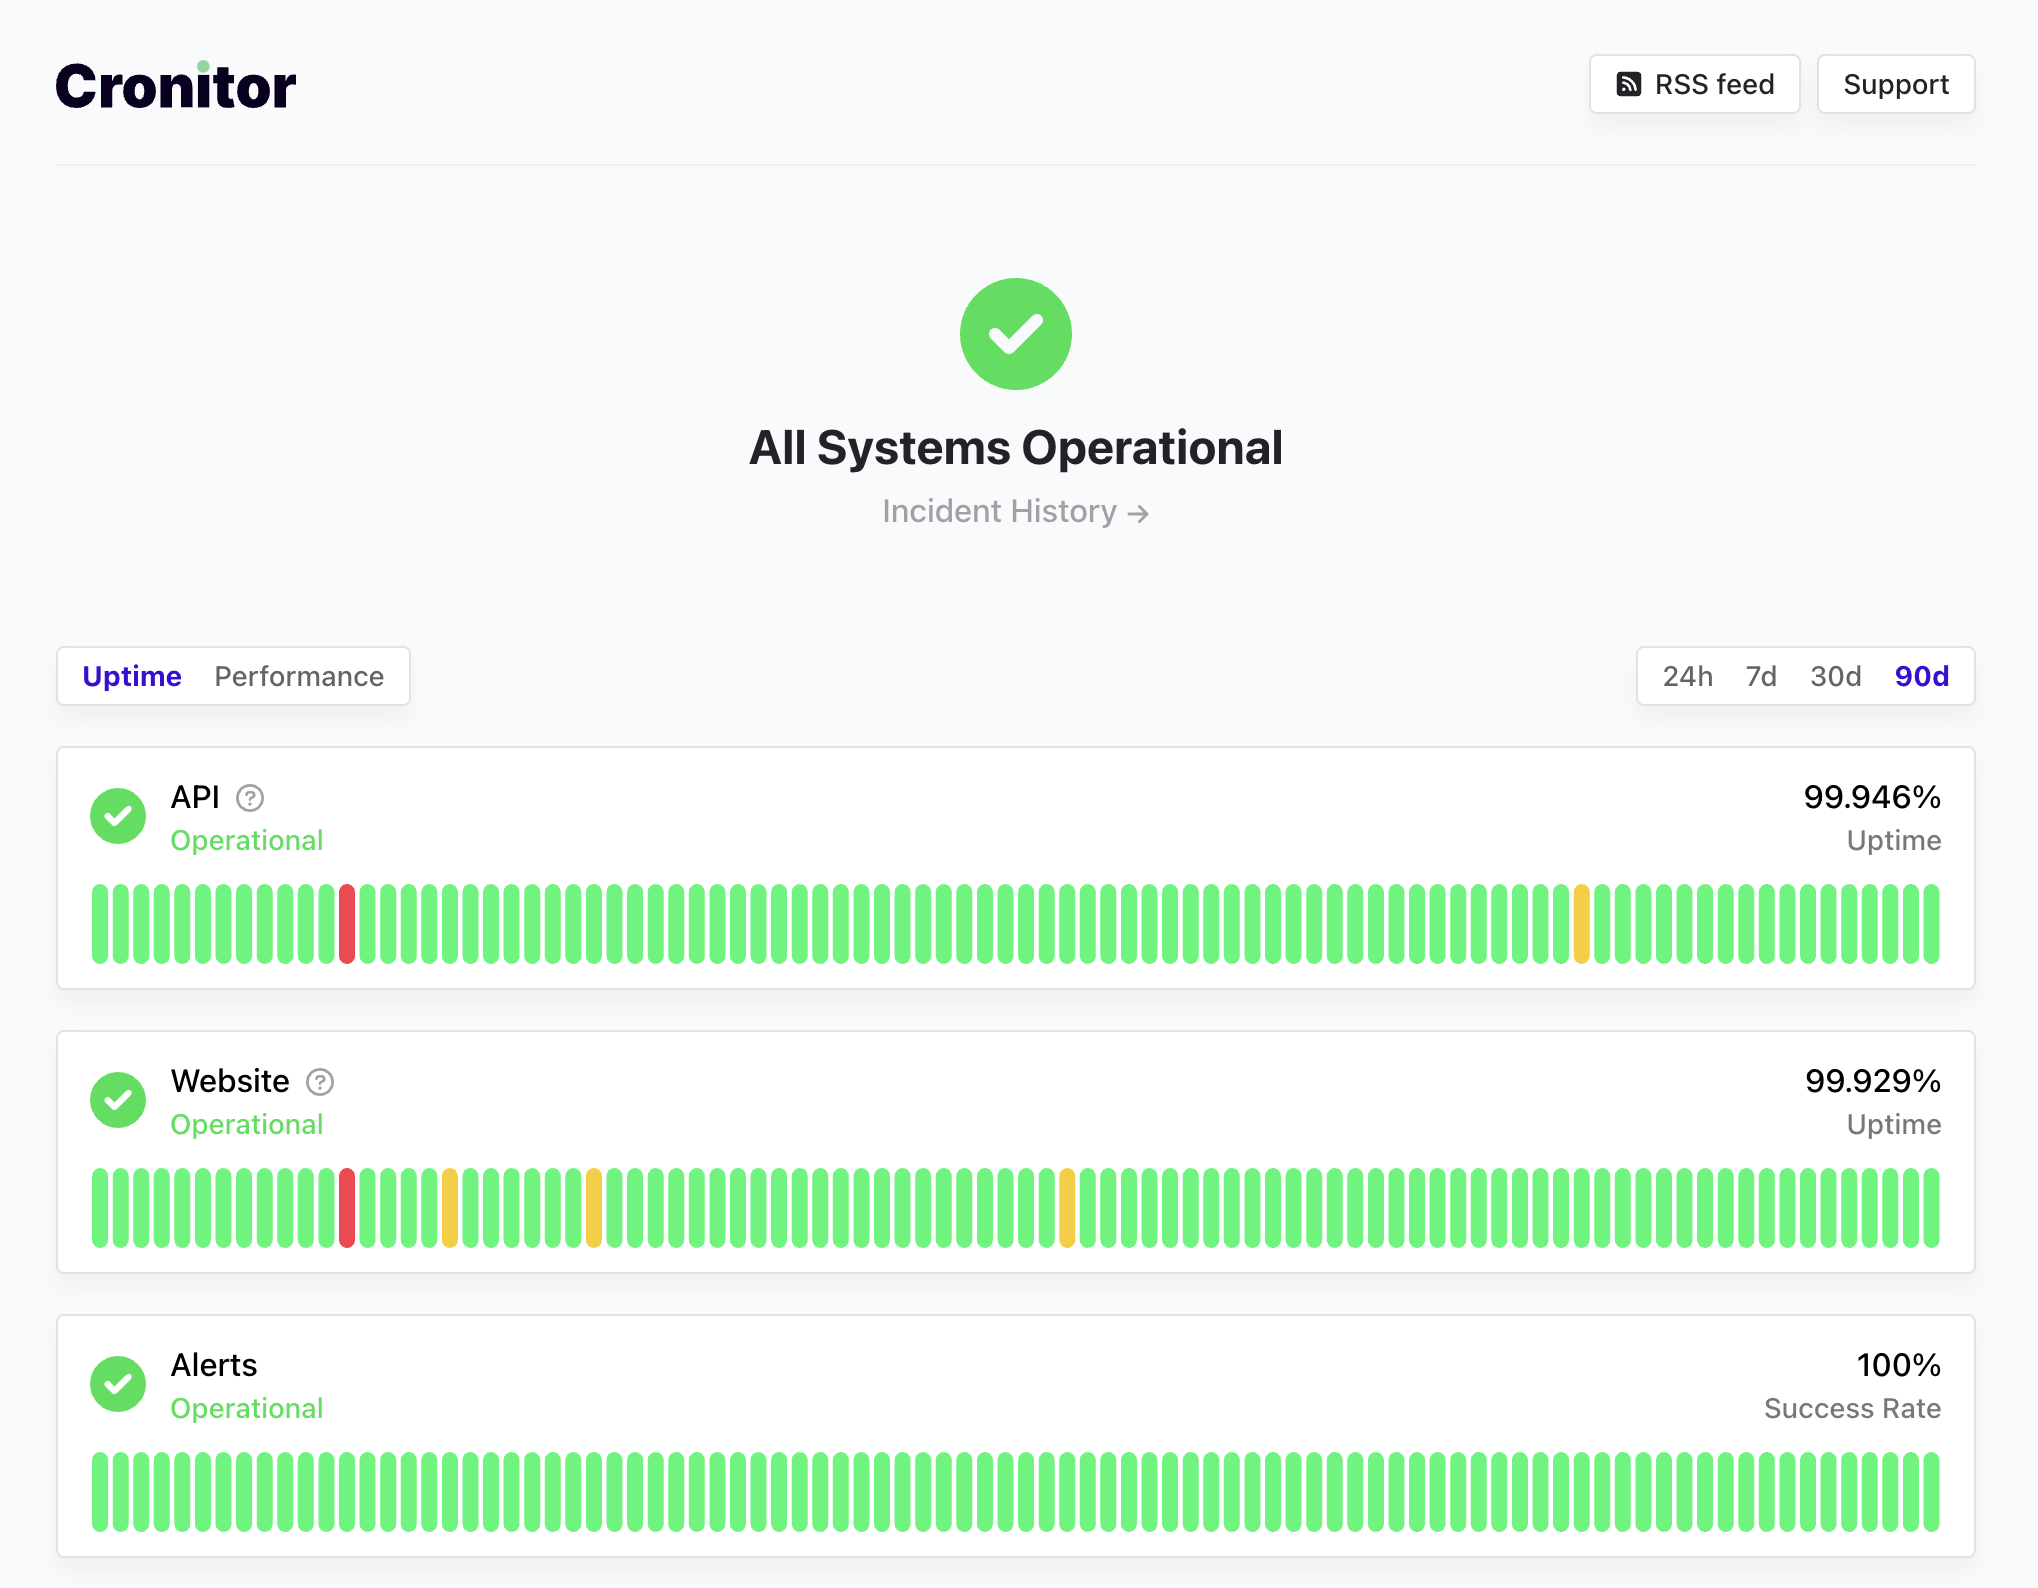
Historical Data — 90-day uptime percentages and performance charts show your service reliability over time.
RSS Feeds — Subscribe to status updates via RSS, which integrates with Slack, Teams, Discord, and other tools.
Creating Your First Status Page
Navigate to Status Pages → Create Status Page.
Configure your basic page settings:
API Example
| Setting | Description |
|---|---|
| Page Name | Display name shown at the top of your status page |
| Website URL | Link to your main website (optional) |
| Support URL | Link to help docs or contact page (optional) |
| Hosted Subdomain | Creates yourname.cronitorstatus.com URL |
curl -X POST "https://cronitor.io/api/statuspages" \
  -u API_KEY: \
  -H "Content-Type: application/json" \
  -d '{
    "name": "Company Status",
    "hosted_subdomain": "company-status",
    "website_url": "https://company.com",
    "support_url": "https://company.com/support"
  }'
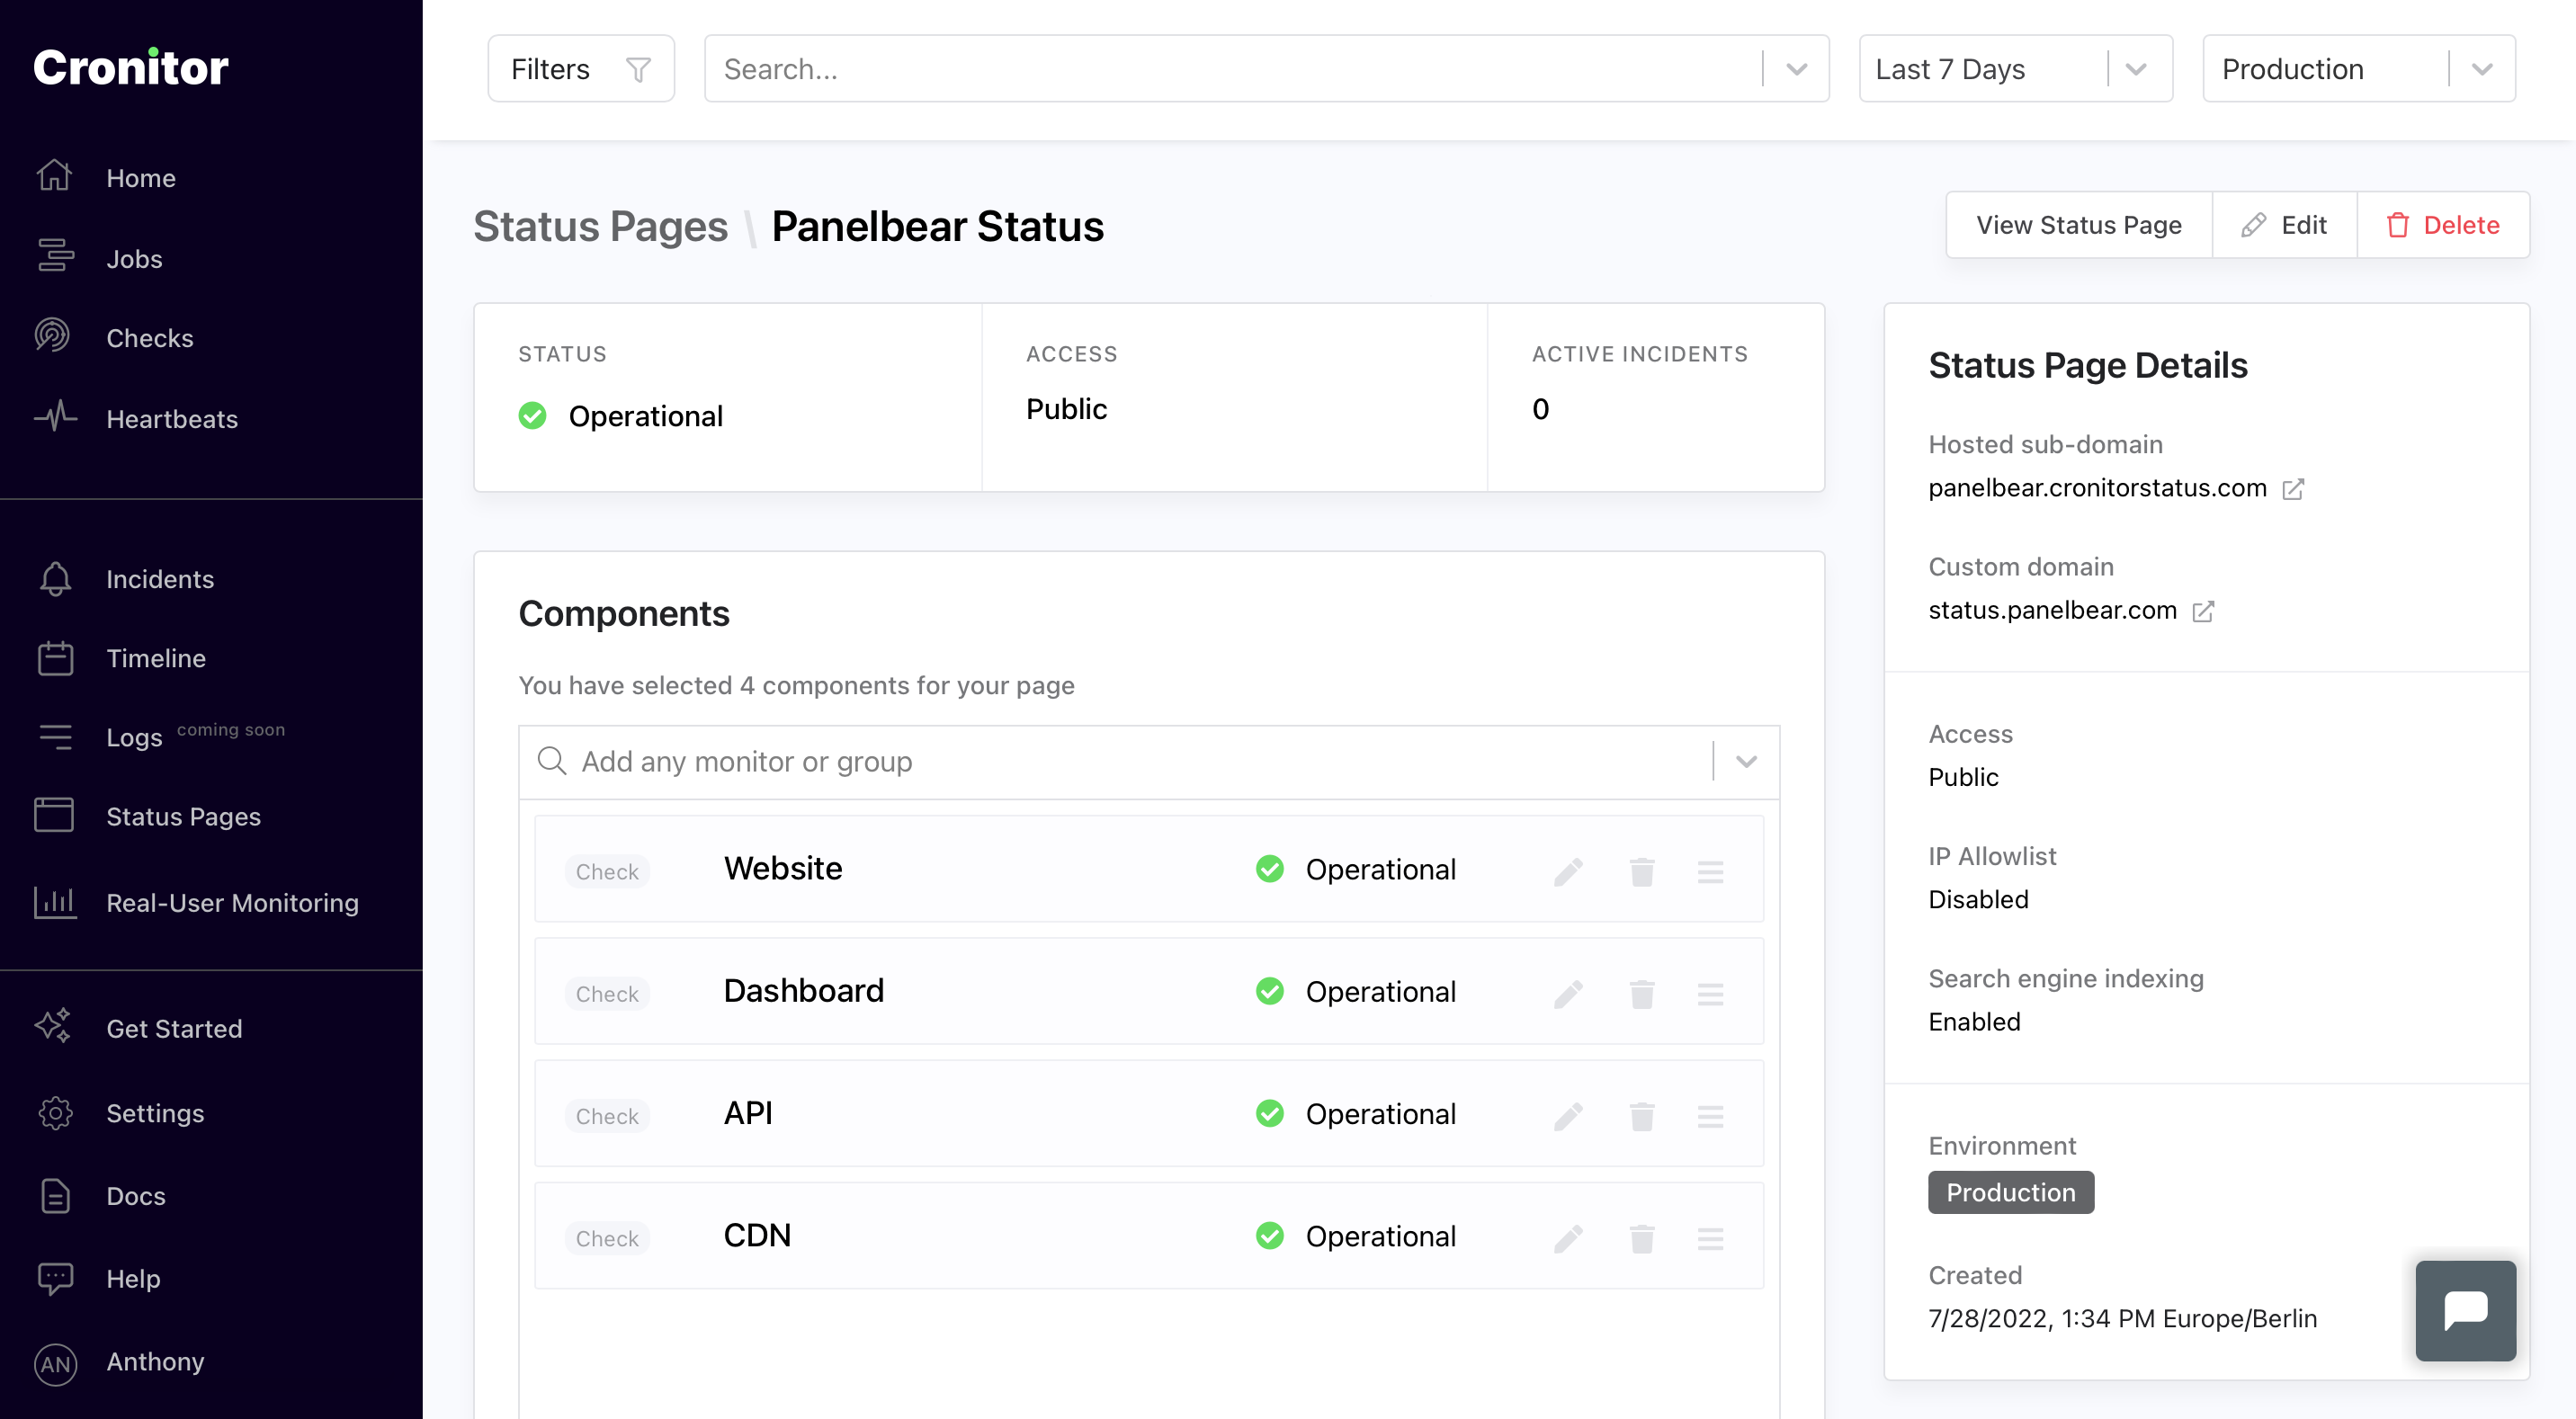
Adding Components
Components represent the services displayed on your status page. Once your status page is created, scroll to the "Components" section to start adding services.
| Component Type | Source | Description |
|---|---|---|
| Monitor Components | Existing Cronitor monitors | Uptime checks, cron jobs, heartbeat monitors |
| Group Components | Monitor groups | Multiple related monitors as single component |
| Custom Components | Manual control | Third-party services outside Cronitor |
Monitor and group components automatically reflect the underlying status. Monitors can be configured to automatically open incidents on failures.
API Example
# Add monitor component
curl -X POST "https://cronitor.io/api/statuspage_components" \
  -u API_KEY: \
  -H "Content-Type: application/json" \
  -d '{
    "monitor": "monitor-key",
    "statuspage": "statuspage-key",
    "name": "API Services"
  }'

# Add group component
curl -X POST "https://cronitor.io/api/statuspage_components" \
  -u API_KEY: \
  -H "Content-Type: application/json" \
  -d '{
    "group": "payment-system",
    "statuspage": "statuspage-key"
  }'
Monitor components automatically reflect their monitor's status and create incidents when monitors fail. Rename components to control how services appear to your users.
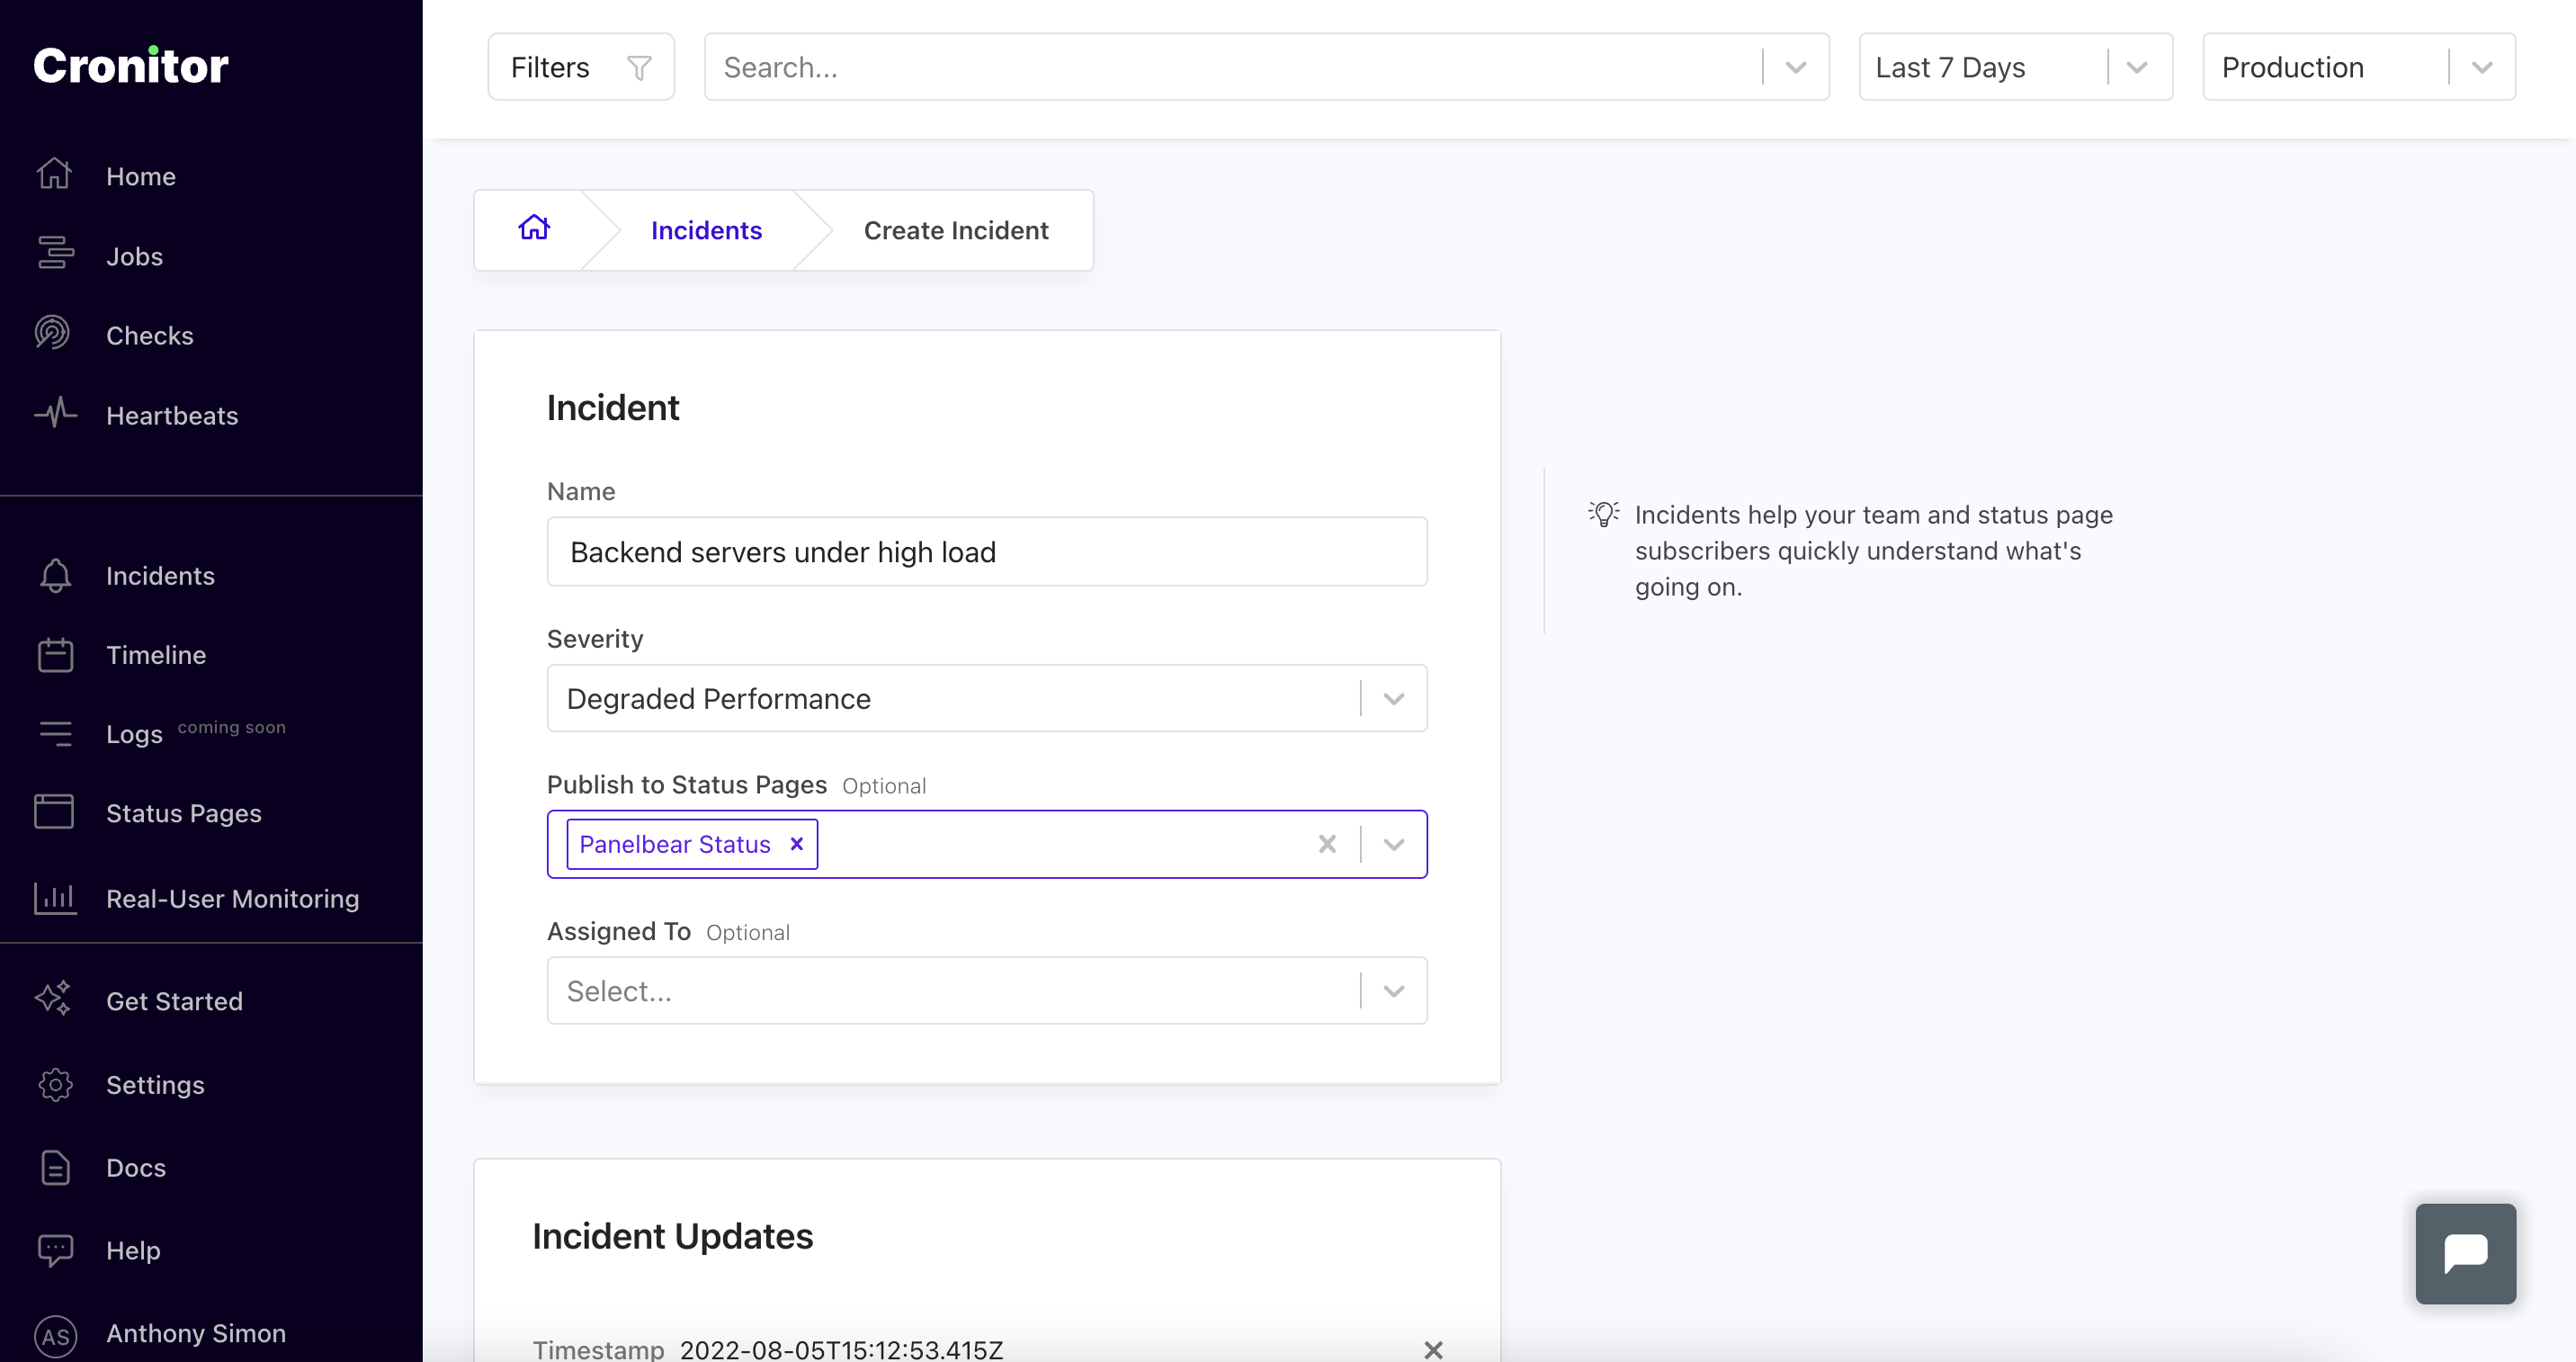
Publishing Incidents
Create incidents to communicate outages, maintenance windows, or service issues. Navigate to Incidents → Create Incident.
| Incident Status | Description |
|---|---|
| Investigating | Team is looking into the issue |
| Identified | Root cause found, working on fix |
| Monitoring | Fix deployed, monitoring for stability |
| Resolved | Issue fully resolved |
API Example
# Create incident
curl -X POST "https://cronitor.io/api/incidents" \
  -u API_KEY: \
  -H "Content-Type: application/json" \
  -d '{
    "title": "API Performance Issues",
    "body": "Investigating elevated response times",
    "status": "investigating",
    "components": ["api-services"],
    "publish_to_status_page": true
  }'

# Add incident update
curl -X POST "https://cronitor.io/api/incidents/INCIDENT_ID/updates" \
  -u API_KEY: \
  -H "Content-Type: application/json" \
  -d '{
    "body": "Fix deployed, monitoring for stability",
    "status": "monitoring"
  }'
Incidents appear at the top of your status page and provide real-time updates to users. Add multiple updates to create a timeline of your incident response.
Custom Domain Configuration
Serve your status page from your own domain (e.g., status.company.com) instead of the default cronitorstatus.com subdomain.
DNS Configuration
| Record Type | Name | Value |
|---|---|---|
| CNAME | status.company.com | cname.cronitorstatus.com |

API Example
# Set custom domain
curl -X PUT "https://cronitor.io/api/statuspages/PAGE_KEY" \
  -u API_KEY: \
  -H "Content-Type: application/json" \
  -d '{
    "custom_domain": "status.company.com"
  }'
DNS propagation can take 5 minutes to 24 hours. For CloudFlare users, select "DNS-only" mode to avoid conflicts.
Branding & Customization
Customize your status page appearance and add company branding through your status page settings.
| Customization | Description |
|---|---|
| Logo Upload | Company logo displayed at top of page |
| Support Links | Contact and help documentation links |
| Custom Domain | Use your own domain instead of cronitorstatus.com |
API Example
# Update status page settings
curl -X PUT "https://cronitor.io/api/statuspages/PAGE_KEY" \
  -u API_KEY: \
  -H "Content-Type: application/json" \
  -d '{
    "logo_url": "https://example.com/logo.png",
    "support_url": "https://help.example.com",
    "website_url": "https://example.com"
  }'
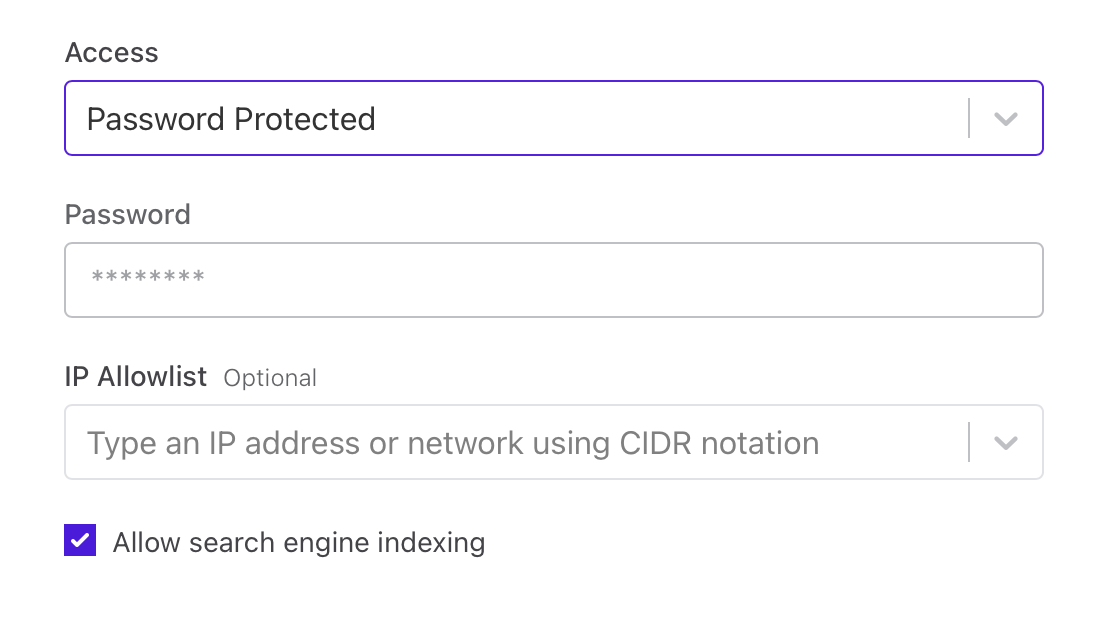
Access Control & Privacy
Control who can view your status page with password protection or IP allowlists.
| Access Level | Configuration | Use Case |
|---|---|---|
| Public | No restrictions | Customer-facing pages |
| Password Protected | Shared password | Internal team pages |
| IP Restricted | IP addresses/CIDR blocks | Office networks, VPNs |
API Example
# Enable password protection
curl -X PUT "https://cronitor.io/api/statuspages/PAGE_KEY" \
  -u API_KEY: \
  -H "Content-Type: application/json" \
  -d '{
    "access": "password_protected",
    "password": "secure-password"
  }'

# Configure IP allowlist
curl -X PUT "https://cronitor.io/api/statuspages/PAGE_KEY" \
  -u API_KEY: \
  -H "Content-Type: application/json" \
  -d '{
    "access": "ip_restricted",
    "ip_allowlist": ["192.168.1.0/24", "10.0.0.0/8"]
  }'
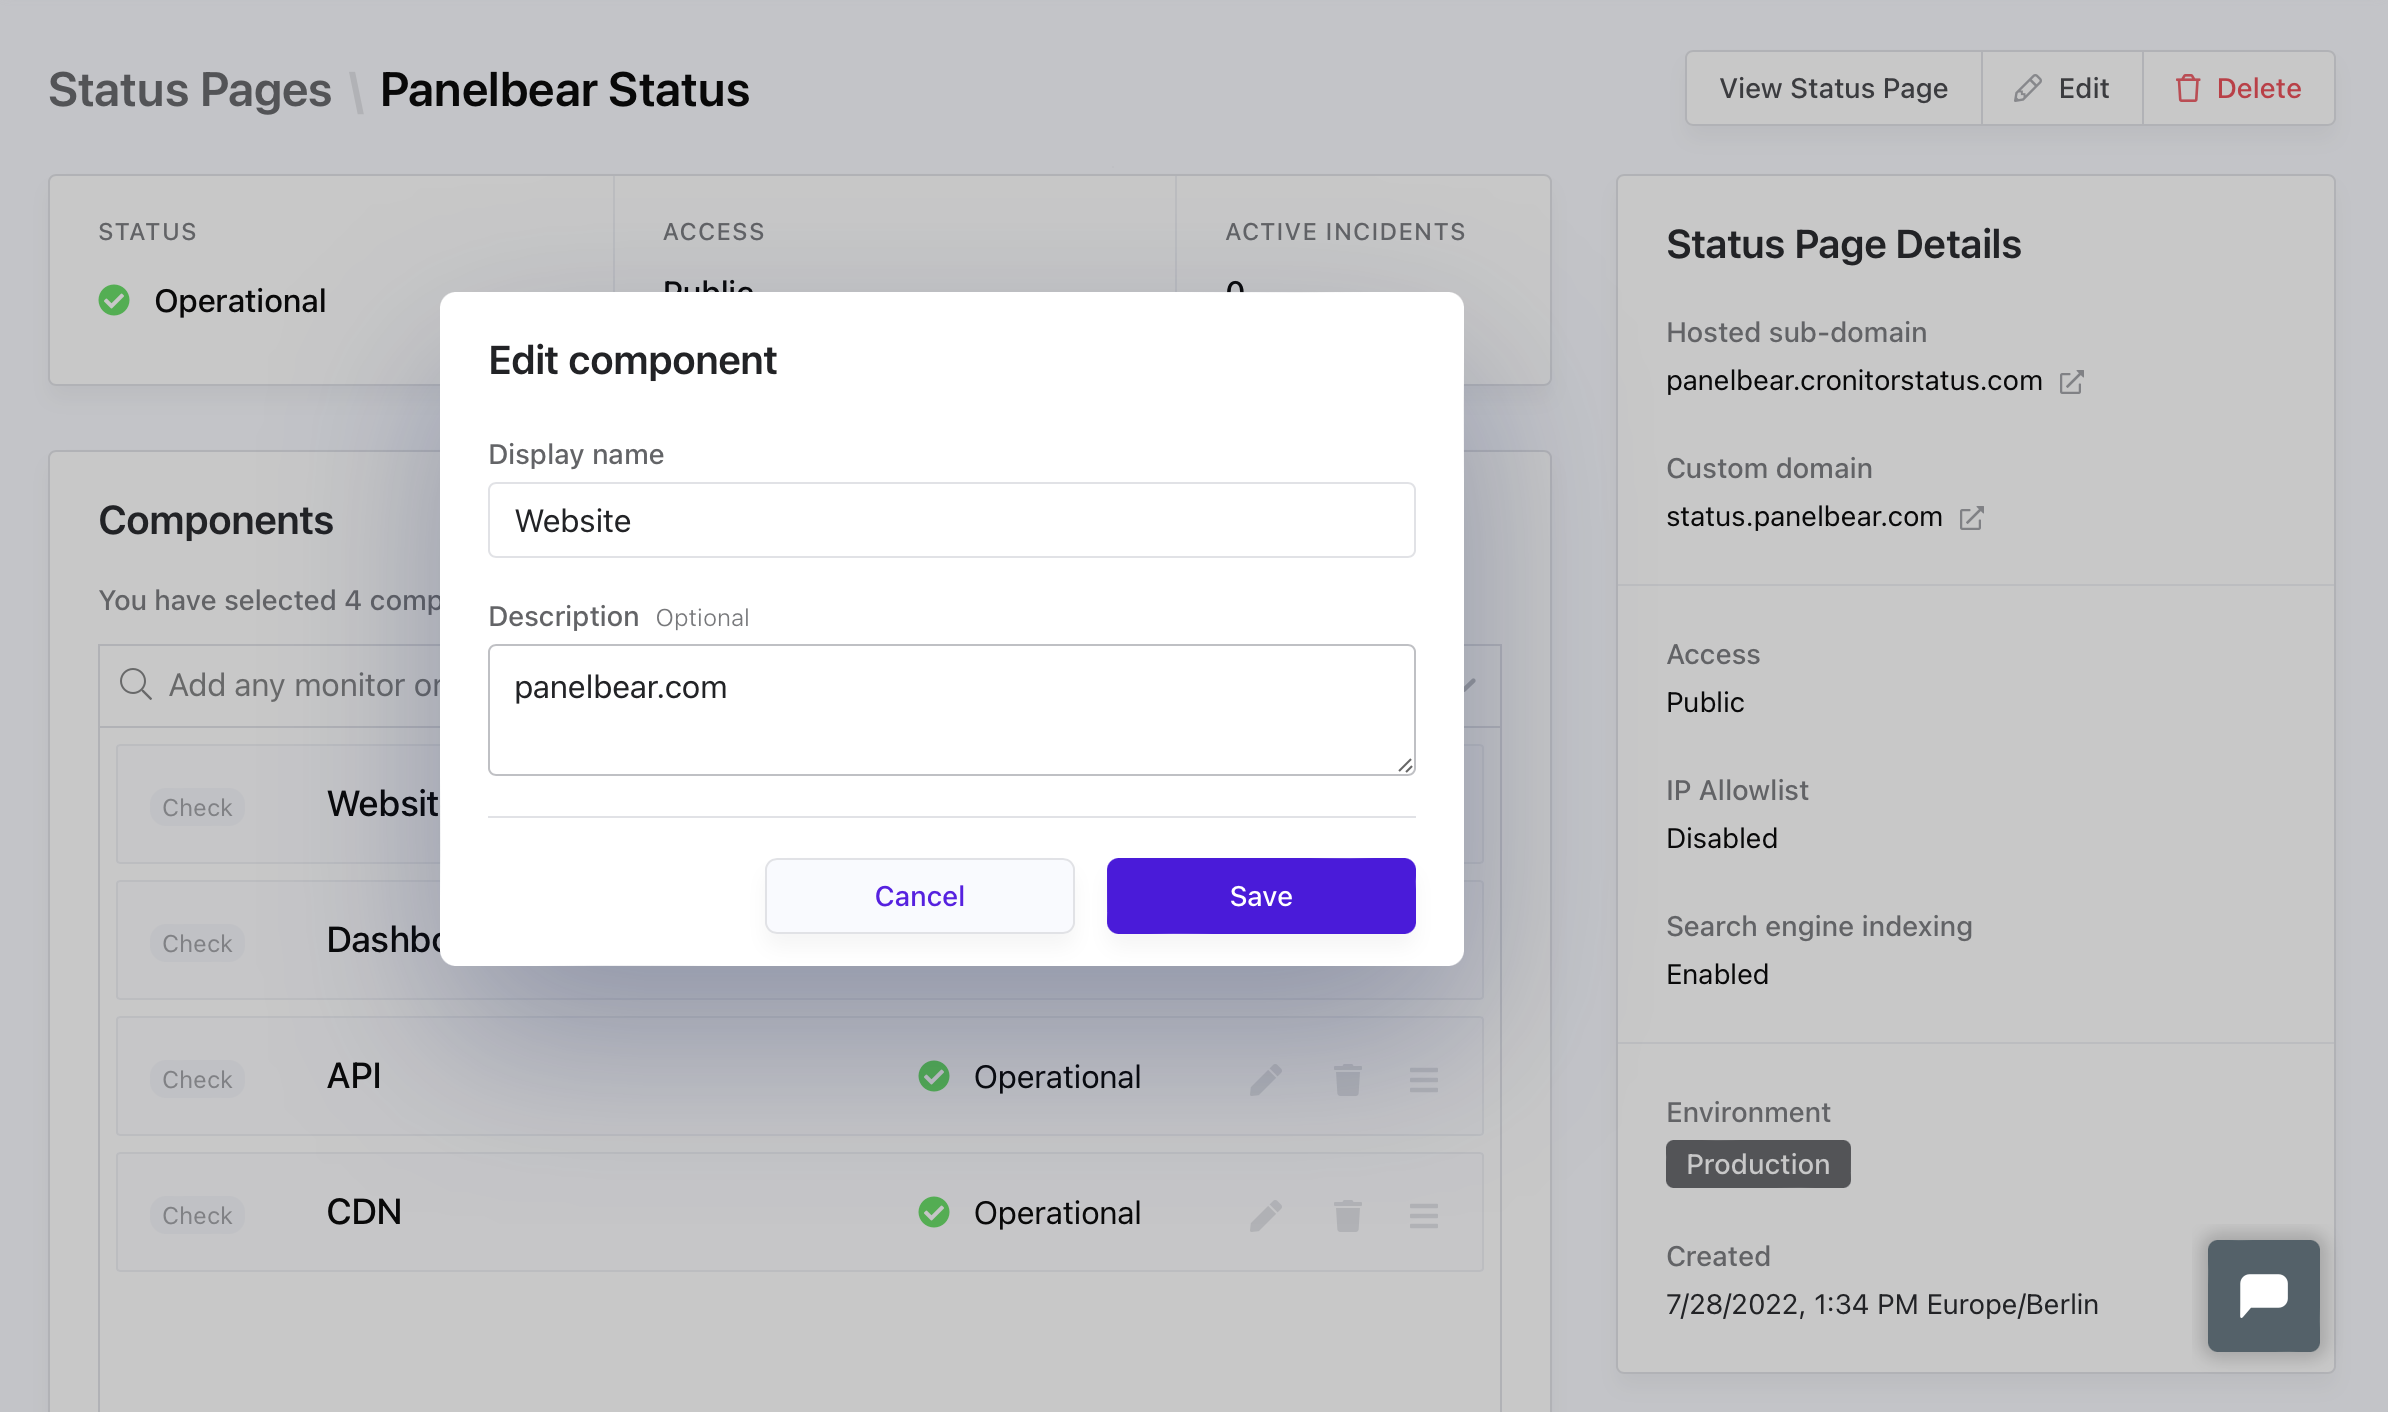
Component Descriptions
Add contextual information to help users understand each component's purpose and scope.
API Example
# Update component with description
curl -X PUT "https://cronitor.io/api/statuspage_components/COMPONENT_KEY" \
  -u API_KEY: \
  -H "Content-Type: application/json" \
  -d '{
    "description": "Monitors https://api.example.com/health endpoint"
  }'
Descriptions appear as tooltips when users hover over the info icon next to component names.
RSS Feeds & Subscriptions
Every status page includes an RSS feed for programmatic access to status updates. Users can subscribe via the RSS feed button in the upper right corner your status page.
How to Subscribe to Status Updates via RSS
Your status page RSS feed can be integrated with team communication platforms and email services to automatically notify stakeholders when incidents occur. This ensures your team and customers stay informed without needing to manually check your status page.
| Platform | Setup Instructions | What Happens |
|---|---|---|
| Slack | Install the RSS app from Slack App Directory, then run /feed subscribe <RSS_URL> in your channel | New status updates automatically post to the channel. Manage with /feed list and /feed remove |
| Microsoft Teams | Add Workflows app, search for "RSS channel message" template, paste feed URL and configure | Status updates appear as cards in the channel when incidents occur |
| Discord | Invite MonitoRSS bot to server, run rss.add <#channel> <RSS_URL> in desired channel | Bot posts each status update to the specified channel automatically |
| Use a service like Feedrabbit: paste feed URL, enter email addresses, choose delivery schedule | Stakeholders receive updates via email digest - no app installation required |
# Access RSS feed
curl https://your-subdomain.cronitorstatus.com/history/rss

# RSS feed with custom domain
curl https://status.company.com/history/rss
For detailed API documentation and advanced configuration options, see our Status Page API Documentation.