Cron Jobs
Creating Cron Jobs in Python
Python is one of the most popular programming languages in the world¹. Easy to learn, and with many excellent libraries, it hits a sweet spot of performance and flexibility. This also makes Python a popular language for creating cron jobs.
This guide will introduce a few of the most popular ways to create cron jobs with Python, but it is by no means an exhaustive list. There are many libraries and platforms for running jobs, but here we will cover:
- Running any Python script as a cron job on Linux.
- Running a cron job using
Celerywith the beat scheduler. - Using a third party tool like Google Cloud Scheduler to run your Python code.
What is a cron job?
A cron job is a command on a Unix server that is executed on a user-defined schedule by the cron scheduler. However, the term is now broadly used by many background task systems, and generally refers to a piece of code running in the background on a repeatable schedule.
What the * * * * * ?!?
One of the strangest parts of a cron job is the scheduling syntax, e.g. */3 2 * * 0-3.
Reminiscent of regular expressions, it is very hard to remember. See our guide on cron schedule syntax or use crontab.guru to translate a cron expression to english.
Run a Python script as a cron job
Before you can schedule your python code to run as a cron job, you need to have it organized as a script that you can run from the command line. If your code exists inside something like a Django view or FastAPI path, you will need to do some refactoring to move code into a shared module that can be used by your framework and invoked directly in a Python script.
If you are running your code as a command line script for the first time, there are usually a few things that every script needs.
You will need to import every library you use, and some may require initialization. In this example, the script is loading and initializing Django:
import os
import sys
import django

BASE_DIR = os.path.dirname(os.path.dirname(os.path.abspath(__file__)))
sys.path.append(BASE_DIR)
django.setup()

from application import archiver
archiver.run()
If you are using any observability tools like Sentry or DataDog, you will need to ensure those are initialized by whatever code you are calling, or initialize them here as part of your bootstrap. For example, this code initializing Sentry could be added before calling
django.setup()above.import sentry_sdk sentry_sdk.init( dsn="https://examplePublicKey@o0.ingest.sentry.io/0", traces_sample_rate=1.0, )Write progress and error logs to stdout by configuring a logger or simply using
print(). Cronitor users will be able to see full output for all jobs directly in the Cronitor UI, but even if you're not using Cronitor this output is gathered automatically by cron for failed jobs, so it's a best practice no matter what you have chosen for your monitoring stack.Save your script and commit it to your source control. We will call our script
run_archiver.pyWith script in hand, the first thing you should do is run it yourself from the command line to ensure that it runs successfully and writes the output logs that you will want to see from your job.
$ python run_archiver.py
Running Job
...
Success!
Finally, it's time to register your script with the
crondaemon that is running on your machine.There are multiple ways to schedule cron jobs but this guide will focus on two simple options. The method you choose should depend on whether you have
rootaccess on the linux machine.Scheduling a cron job when you have
rootorsudoprivilegesWith administrator-level access to a linux instance, the best practice for scheduling a cron job for your scripts is to create an application-specific crontab file in the server's
cron.ddirectory, usually located at/etc/cron.d/. This "drop in" directory is scanned every minute by cron and all you need to do is copy a crontab file into place and wait for the scheduled time for your jobs to run.The crontab file itself has a very simple format. It may include comments, environment variables, and the jobs to be run. Each job must fit on a single line that begins with a valid cron schedule expression, the user the job should run as, and finally the command string to be run.
# Run the data archiver once a day as the dataproc user
5 4 * * * dataproc python /etc/scripts/run_archiver.py
Scheduling a cron job without
rootprivilegesIf your system administrator allows it, cron jobs can also be scheduled by users in a private user crontab file. These user crontabs can only run commands as yourself. To interact with your user crontab, use the
crontabcommand.View your crontab file:
$ crontab -lOpen your crontab in a text editor to make updates:
$ crontab -eFrom the text editor, add your new cron entry:
# Run the data archiver once a day
5 4 * * * python /etc/scripts/run_archiver.py
Common Mistakes
With your script written, tested and scheduled you are almost done. You would think that a script that works for you will also work when run as a cron job, but there are a few key differences between your shell and the cron execution environment and these differences can often cause headaches when scheduling jobs:
Not using absolute paths
The current working directory used by Cron depends on several factors, but it's usually the job owner's home directory. Avoid any confusion here by exclusively using fully-qualified paths when you add the job to the crontab file. Similarly, if your script is invoking any other commands, it should use a fully qualified path or set its own working directory before doing any invocations.
Missing environment variables
Even though cron runs your cron jobs using a real user account, it does not trigger an interactive session, so any environment variables you may be loading in
.bash_profileor.bashrcwill not be available. If your script expects certain environment variables, you can either set them within the crontab file itself, or have each line of your crontab source your.bash_profilebefore invoking your script.5 4 * * * source ~/.bash_profile ; python /etc/scripts/run_archiver.pyThe wrong version of Python
If you are using a tool like virtualenv to isolate your Python dependencies, you will need to activate that virtual environment when invoking your script. The easiest way to do this is to use the
pythonbinary symlinked in the environment:5 4 * * * /etc/virtualenvs/example/bin/python /etc/scripts/run_archiver.py
By following these best practices and with a small amount luck, you will hopefully see that your cron job runs precisely at it's scheduled time and finishes successfully. If you are not so lucky, we have a comprehensive troubleshooting guide for cron jobs that will walk you step-by-step through the reasons that cause most cron job failures.
Run a cron job using Celery's beat scheduler
Celery is a popular Python library for running background tasks with asynchronous task queues that trigger commands in a separate worker process. The most common use case is to add jobs to a celery task queue from your application code when a user does things like ask for a password reset email. When you use the celery-beat package, you can also add scheduled jobs alongside these event-driven tasks. Note: This guide assumes that you are already running Celery in your app.
First, locate your Celery initialization code and add a task for your new cron job. This is usually in a file called tasks.py:
from celery import Celery
from celery.schedules import crontab
app = Celery()

# ... existing celery tasks here

@app.task
def run_archiver():
    from application import archiver
    archiver.run()
Define a beat schedule that will be read by Celery on start-up:
app.conf.beat_schedule = {
    'run-archiver': {
        'task': 'tasks.run_archiver',
        'schedule': '5 4 * * *'
    },
}
app.conf.timezone = 'UTC'
Bonus: Automatically monitor your Celery cron jobs with Cronitor's Python SDK. Learn more about monitoring Celery.
import cronitor.celery
# Discover all of your celery tasks and automatically add monitoring.
cronitor.celery.initialize(app, api_key="<cronitor api key here>")
Run a Python script with a cloud scheduler
The idea behind a cloud scheduler is simple: You provide a schedule and a URL to an endpoint in your web application, and the service will load your endpoint at the appropriate times, often with nice features like retries and output capture. Major cloud vendors offer schedulers, for example the Google Cloud Scheduler offered by GCP, and there are a number of other SaaS services for scheduling and running jobs, including the popular free service Cron-Job.org
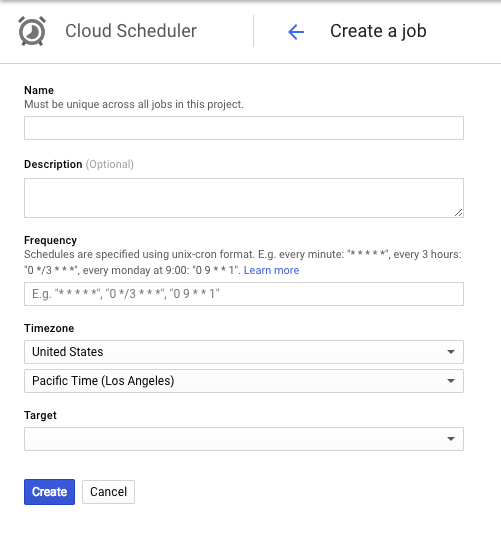
Here's a look at the configuration form for a new scheduled job using Cloud Scheduler. Beyond common fields like name and description, you are left with the same configuration options as you find with Linux or Celery cron jobs: A Frequency field for the cron schedule, a Timezone selector used when evaluating your schedule, and finally a Target that specifies the web URL to trigger.
The advantage of using a 3rd party scheduler is that you can add a cron job to your application simply by adding a new endpoint and scheduling its URL for execution. This is a popular method for getting started with cron jobs, but there are a few concerns with this approach that could result in unreliable cron job execution:
- Be careful with timeouts Because this job is triggered by a web request there are at least two places it might hit a timeout that kills your job before it has completed all of its work. First, the service you are using likely has implemented a timeout. For example, Google Cloud Scheduler has a 30 minute timeout on all requests. Separately, your webserver or application platform may also enforce a timeout. It is common for a nginx webserver to have timeouts as low as 60 seconds, and if you are running your application in a Serverless environment, AWS Lambda invocations are limited to just 15 minutes. When a timeout is hit your job will be killed immediately, no matter how close or far it is from finishing its job.
- Limited log ingestion Writing audit logs from a cron job as it runs is critical to verifying and troubleshooting your jobs, but this can be tricky when you are using a 3rd party service to invoke your jobs. Third party services will limit both the total bytes allowed and their retention period. This truncation may even happen silently so it's important to verify and validate your job logs after scheduling a new job.
Using python-crontab to manage your crontab files
The python-crontab module gives you a simple API to mange crontab entries in your application using pure python. By integrating python-crontab into a setup or deploy process, you can automatically configure necessary crontab entries directly from your code. Here's an example of adding a simple cron job:
$ pip install python-crontab
from crontab import CronTab
cron = CronTab(user='root')
job = cron.new(command='echo hello_world')
job.minute.every(1)
cron.write()
Monitor Python cron jobs
Due to their very nature — running in the background — cron jobs are notorious for failing silently. Cronitor makes it easy to monitor your cron jobs, and will alert you immediately when a job fails, or doesn't run on time.
Cronitor has a Python SDK and Celery integration that make it easy to add monitoring with just a couple of lines of code.
Monitoring Python Cron Jobs
# Sample Python configuration
import cronitor
cronitor.api_key = '<cronitor api key here>'

# the start and end of the function execution are monitored
# and any errors are reported automatically (and reraised)
@cronitor.job('important-task')
def main()
    ...

if __name__ == '__main__':
    main()
Monitoring Celery Periodic Tasks (Cron Jobs)
# tasks.py
import cronitor.celery
from celery import Celery
from celery.schedules import crontab
app = Celery()

# define celery tasks here...

# Discover all of your celery tasks and automatically add monitoring.
cronitor.celery.initialize(app, api_key="<cronitor api key here>")